Evolution of Building Elements
2 External walls
Early Brickwork
During the 1700s there were a number of improvements in brick making. Blended clays, better moulding techniques and more even firing gave greater consistency in brick shape and size. Fashion dictated brick colour: the reds and purples popular in the late 1600s gave way to softer brown colours in the 1730s. By 1800 the production of yellow London stocks provided a brick colour not that much different from natural stone. The repeal of the brick tax in 1850 gave the brick industry a new impetus. Improved mixing and moulding machines, together with better firing techniques, allowed brick production to reach new heights. Bricks were now available in a range of colours, shapes and strengths that would have been unimaginable a 100 years earlier. Better quarrying techniques allowed extraction of the deeper clays which produce very strong, dense bricks; vital for civil engineering works such as canals, viaducts sewers and bridges.
Brick bonding
By the end of the 19th century most houses had walls of at least one-brick thickness. Houses over three storeys often had thicker walls, usually reducing in thickness at each upper-floor level. The brickwork itself (at least the brickwork on view) was generally laid to a very high standard. Most houses were built in Flemish bond although rear walls or walls hidden by render were often laid in Garden wall bond (usually English).
Stonework
Stone was often used for prestigious buildings or in areas where it naturally occurred. In upland areas (the north and west) stone was often the obvious choice for building because it was readily available (and prior to the railways these were often areas where bricks were expensive). There are 3 groups of stone; igneous, sedimentary and metamorphic. The sedimentary group, which includes limestone and sandstone, accounts for most of the stone used for building in the UK.
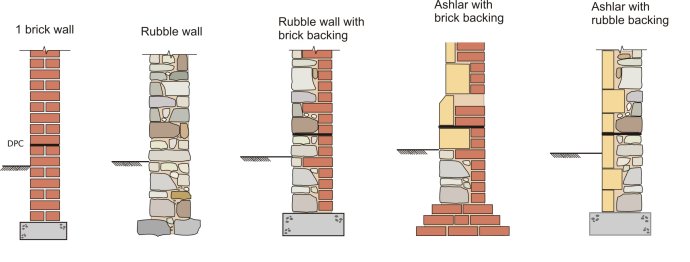
Rubble walling is found in a variety of styles. At its cheapest it comprises rough stonework, built as two outer leaves and bound together with copious amounts of lime mortar. More expensive work comprised squared rubble possibly set against a brick backing. In most situations a stone wall has to be thicker than a brick one. So, whereas a 1 brick thick wall (215mm or so) might be fine for a two or three storey house, a stone wall is likely to be 325mm or even more. Most rubble walls were pointed flush or slightly recessed. The ribbon pointing so often seen nowadays is not traditional, neither is it particularly durable.
Stonework which is dressed and/or finely cut is often referred to as dimensioned stone. Sometimes it's referred to as freestone. This means it can be worked (cut, shaped and smoothed) with a chisel and a saw in any direction. It has a fine grain and is free from obvious laminations and pronounced bedding planes. In the 18th century whole cities were built (some rebuilt) in stone. It was not cost effective to build the whole of the wall in freestone and a backing material of rubble or brickwork can nearly always be found. In some houses only the front elevation would be built in freestone, the sides and back being constructed of rubble or brick. To bond the two halves of the wall together, 'through' or bonding stones were used.
Where the freestone is laid with very fine joints, almost invisible from more than few feet away, the work is knows as ashlar. In some parts of the country the stones were cut with a taper to make the joints easier to form. Wedges made from bits of timber or even oyster shells were often pushed into the back to provide stability as the mortar set. These buildings were built with lime mortar which hardened very slowly. Hydraulic limes were not unknown but they were less common and more expensive. In addition they often set too quickly resulting in high waste on site.
Mortar
Lime mortars were common until the 1930s, in some parts of the UK, even later. Limestone or chalk was burnt with coal to form Quicklime. The burnt lime is known as lump lime. The Quicklime was then slaked with water and then mixed with fine aggregates (nowadays sand) to form mortar. It could take many months for a lime plaster to fully set. Then process is known as carbonation. Some limes have a hydraulic set (a bit like a weak cement). This could be induced by adding pozzolans which contain silica. Another option was to use a lime which naturally contains silicas (usually a proportion of clay). A hydraulic 'set' is quicker and stronger than carbonation. Some of the very strong hydraulic limes are not dissimilar to modern cement; made of course, from chalk and clay.
During the 1930s and 1940s cement mortars gradually replaced lime ones. Lime
was often added to the mix to improve its working and qualities and durability.
More detail can be found lower down the page.
Pointing
In the early 1900s period joints were usually finished flush or slightly
recessed. Where very good quality bricks were used the joints were often
only 8mm, or even less. This, together with the use of brick dust in the mortar,
meant that the mortar had very little affect on a buildings appearance.
Working-class housing was usually pointed in a lime mortar which included
local industrial waste products as fine aggregate. Perhaps ash was the most
common. The photos below show three examples of good quality 19th century brickwork.

Tuck pointing was usually reserved for the best quality work. Tuck pointing is basically in two parts, a bedding mortar often containing aggregates to match the colour of the bricks or stonework, and a thin ribbon of lime pointing to finish the joint. From a distance a wall that is tuck pointed appears to be finely jointed. Examples of tuck pointing can be found under the Walls section of this web site.
Cavity walls
In the latter part of the 19th century a number of houses were built with
cavity walls. It was not, however, until the 1920s that this became the accepted
form of construction. Cavity walls were cheaper to build than their solid wall
counterparts. In addition they offer improved thermal insulation and better
weather protection. Most walls comprised two half-brick leaves with a 50mm
cavity. The two halves of the wall were tied at regular intervals with steel or
wrought iron wall ties. The external leaf of brickwork was laid in facing bricks, the internal
leaf in commons. A few early cavity walls had an external leaf one brick thick
and, in some early forms of construction, the DPC ran right across the cavity.
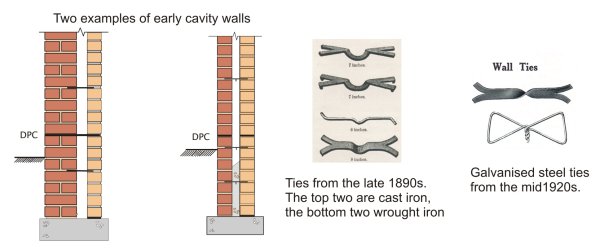
DPCs (to prevent rising damp) were in common use by the early 1900s. They could be made from lead, pitch, asphalt and slate. Not until the mid 1920s did vertical DPCs become a standard detail around openings.
1930s to 1960s
During this period cavity walls changed little. Mortars gradually became cement-based rather than lime-based because the faster setting mortar meant faster construction. Blockwork became a common material for the inner leaf of cavity walls - the blocks were usually made with an aggregate of stone or industrial waste (clinker and breeze were common). A few houses, usually Modernist-style houses with a rendered finish, were built with walls of solid blockwork (i.e. non cavity).
Note that during the 1950s and early 1960s several thousand houses were built in non-traditional construction. These were often constructed using precast frames or panels; in some cases insitu panels. Some systems were based on timber. For more information go to the System Building section of the web site.
1970s to 1980s
In the 1970s insulation standards slowly improved. A maximum 'U' value of 1.70 was introduced in 1972 (a measure of a the walls ability to transmit heat - explained further in the Walls section). Achieving this standard was relatively easy; a brick external leaf, a 50mm cavity, and a dense block inner leaf finished with 13mm lightweight plaster, just made the 1.7 threshold. In 1980 the maximum U value dropped to 1; this required lightweight blockwork in the inner leaf. From this period to the present day most lightweight blocks have been made from aerated concrete. They were (and still are) made from cement, lime, sand, pulverised fuel ash and aluminium powder. Once these materials are mixed with hot water the aluminium powder reacts with the lime to form millions of tiny pockets of hydrogen. However, there are several other materials for blockwork which have enjoyed brief popularity. These include concrete blocks faced with insulation, hollow blocks containing polystyrene granules and blocks made from pumice or no-fines concrete.
Modern cavity walls
In the 1990s the maximum U value dropped to 0.45; this normally required a very thick lightweight inner leaf or cavity insulation. There are three common options, most of which require lightweight or aerated blocks in the inner leaf. These are:
- a clear cavity with an insulated dry lining
- insulation boards which partially fill the cavity
- insulation batts which fill the cavity.
It is still possible to build solid walls - but this is impractical using brick. Only aerated concrete will give acceptable levels of insulation.
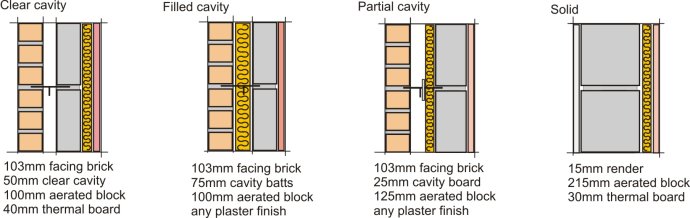
At the time of writing (2006), U values have to less than 0.3 so a modern cavity wall has a U value some 5 or 6 times better than its 1920s counterpart. In the above examples slightly thicker insulation will give a U value of 0.30. In modern construction cavity widths have increased well beyond the 50mm common 80 years ago. A 50mm clear gap is required if board insulation is used. This commonly requires a cavity 90mm wide.
Wall Ties
Wall ties are now mostly stainless steel. There are various patterns; the washer shown below is to hold insulation boards in position against the inner leaf. These particular ties are all made by Ancon.

Modern mortars
Modern mortars are made from cement and sand. Hydrated lime (i.e. bagged
lime) is often introduced into the mix to give it a more plastic feel and to
make it more workable. Lime also improves the mortars ability to cope
with thermal and moisture movement. In recent years the use of pre-mixed mortars has become common. These are
delivered to site in sealed containers, ready for use. They usually contain a retarder so they remain usable for 36 - 48 hours or so. At the end of this
period they develop their strength in the same way as normal mortars.
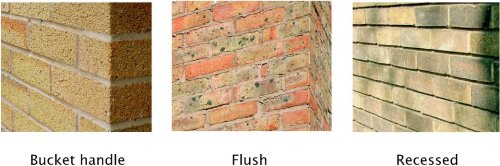
The face of the joint may be finished in a number of ways the three most common are shown below. Tooled joints
(where the mortar is pressed against the brickwork) offer the best weather
protection because the tooling smoothes and compresses the joint.
This is a copy of an older 'hand out' on evolution - you may find it useful.The images are pre-publication proofs from 'House Inspector'.
except where acknowledged